In today’s life, many people’s homes have some old photographs of the past, but due to the objective conditions at the time, most of these photos were black and white. The people in the photographs are not absent from their youth. They are passing away. They want to relive or cherish the memory of their style. They always feel that they lack a true color and cannot but say it is a pity. There are many ways to color these pictures, but it's not easy to be able to make the color realistic. Here's a way to color black and white photos with Photoshop computer software. Personal feelings can be made more realistic and natural.
First, the basic principles and methods of coloring
The color of a person's skin naturally changes in the photo, and the color is complex and abundant. But in theory, we can assume that a person's skin hue and saturation are only related to human race, but for the same person, we can assume that the two parameters of all skin colors are basically fixed. However, the reason why the skin color on the portrait photos is rich and varied is the influence of external lighting, that is, brightness, and the colors in the same brightness area are basically the same. According to this hypothesis, we only need to color the skin color of the photos according to the brightness parameters. Finally, a natural transition process can be done.
Second, color examples
1. Scan the photo into your computer and convert it to Lab mode. Since the brightness will become a major identification parameter during the operation, the Lab mode can be used to operate the brightness channel (L channel) so that we can meet different color requirements depending on the brightness. Here is a picture of a child as an example.
2. Make a selection, use the selection tool to select all of the portrait's skin, use "Layer" → "New" → "Layerviacut". In this way, the skin of the person to be used can be individually layered, and the hair of the person can also be built separately in the same way.
3. Specify the current operation layer as the skin layer, turn to the channel panel, and select “Luminance Channel (L channel). In the toolbar, specify the foreground color as L:95, a:0, b:0. Execute the command in the menu. : "Select" → "Color Range", the tolerance parameter is set to be between 20 and 30, so that all the regions in the brightness range in the picture can be selected.
4. Call the menu command: "Select" → "Load Selection". In the dialog box that pops up, select the intersection set option (that is, the last item Intersect with selection, the same below) so that all selections are guaranteed to be within the skin.
5. In the channel control panel, specify the Lab synthesis channel (that is, the first channel). The foreground color is specified as: L:95 unchanged, a:5, b:19.
6. Select the brush tool in the toolbox. The coloring mode of the tool is set to Color. Set the brush brush to 60 or more (it can be larger, this can increase the speed of coloring). Note: The Color mode is a mode that maintains the brightness and draws and creates the resulting color using the hue and saturation of the specified foreground color.
7. Use the brush tool to paint in the selected area of ​​the image until all the constituencies have been painted.
8. Cancel the selection and start coloring the next brightness. Select the L channel in the channel panel, set the foreground color to LAB90, 0, 0, call the menu “Select†→ “ColorRangeâ€, and set the color tolerance value to 30. Make constituencies.
9. Call the menu item: "Select" → "Load Selection". Select the intersection option in the popup dialog box to select the skin of this brightness range.
10. Select the LAB synthesis channel in the channel panel and change the foreground color to L:90, a:9, b:27.
11. Use a brush tool to color the selection.
12. Start to color the next brightness, select the L channel in the channel panel, set the foreground color as: LAB80,0,0, call the menu "Select" → "ColorRange", set the color tolerance value to 30, press OK made a constituency.
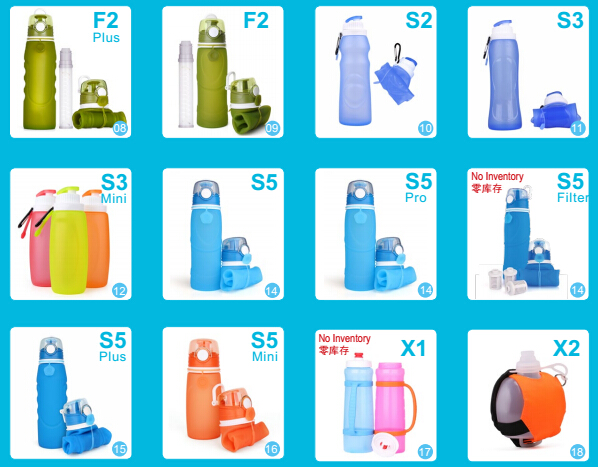
Outdoor Collapsible Silicone Water Bottles
Silicone material are knows as safe, our outdoor collapsible Silicone Water Bottles are made of the highest medical grade silicone material,
which are normally used for making baby nipple, and silicone water bottles are have a better touch feeling, light, other material water bottles
may 5-10 times weight or more, another very cool advantage of our outdoor collapsible silicone water bottles is: it can be fold into just a
wallet size after you drink up, it will save a lot of space for bag or you can even put it in your pocket.
The volume of our Outdoor Collapsible Silicone Water Bottles are ranged from 1000ml, 750ml to 500ml , 320ml, so you can have various choice
for your whole family, pls contact our sales for more.

For more: Sport Foldable Silicone Water Bottles, Filter Silicone Water Bottles, Insulate Silicone Water Bottles, Silicone water bottle
Outdoor Collapsible Silicone Water Bottles
Outdoor Collapsible Silicone Water Bottles,Outdoor Water Bottle,Foldable Drink Bottle,Collapsible Water Drinking Bottles
Shenzhen Kean Silicone Product Co., Ltd. , http://www.keansilicon.com